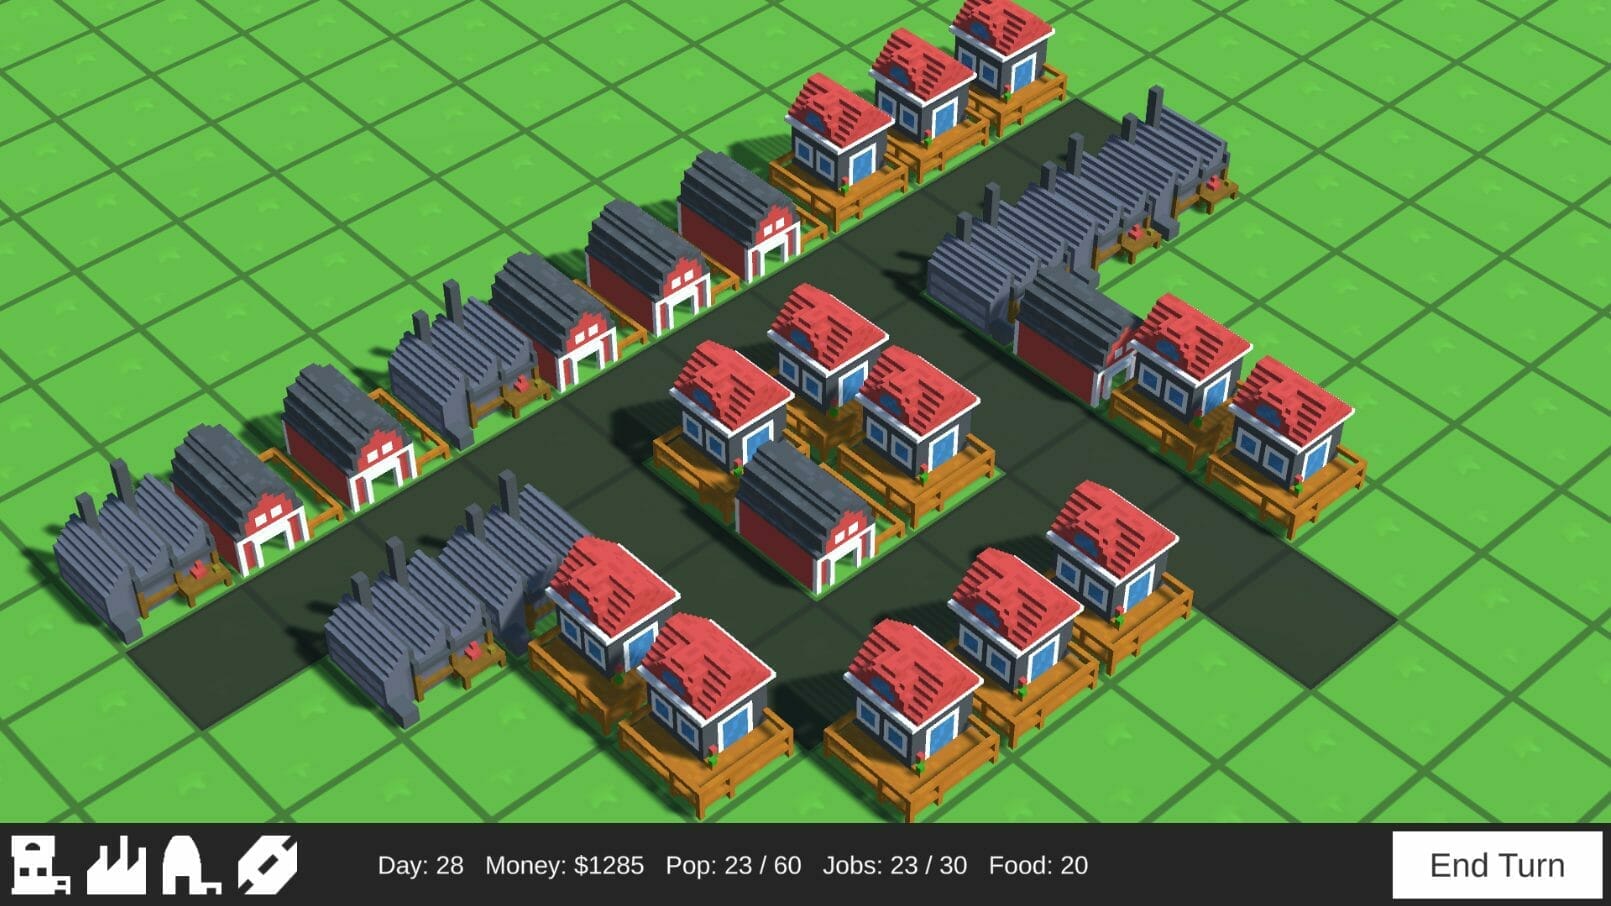
Do your players long for the exhilarating sensation of controlling a whole city? Well, let’s build a Unity city builder to solve that!
From popular games like Sim City to lesser-known indie games like Banished, city-building games are an immensely popular sub-genre of strategy. Not only are they beloved by players, but they also present developers with a special challenge in terms of game design. Despite all the under-the-hood math involved, though, they can also be a great first choice of game for a beginner to create on their own!
In this tutorial, we’ll be creating the foundations of a city-building game in Unity. This project will feature a versatile camera controller, different buildings that can be placed, population/job/food simulations, and even a UI to tie it all together. By the end, you’ll be able to easily add in new buildings since we’re going to be using scriptable objects. So if you’re ready to develop your own city-building game from scratch, let’s get started.
Table of contents
Unity City Builder Project Files & Prerequisites
In this Unity City Builder tutorial, we’ll be needing some assets such as 3D models and textures.
Before jumping in, do note that this tutorial does assume you know the basics of Unity. Just starting out? Try out some of our other Unity tutorials first.
Alternatively, if you’re keen on enhancing your game development skills, Zenva’s Strategy Game Development Academy might just be for you. It’s an extensive collection of Unity-focused courses that covers everything from basics to building complete strategy games, aligning perfectly with your journey to build a Unity City Builder Game from scratch. With its immersive curriculum and hands-on challenges, you’ll dive deep into the world of strategy game creation, equipping yourself with practical skills for future projects.
Creating the Unity City Builder Project
First, let’s begin by creating a new Unity project with the 3D template. In our new project, let’s start by creating some folders.
- Building Presets
- Icons
- Materials
- Models
- Prefabs
- Scripts
- Textures

Now let’s start importing the required assets such as 3D models and textures. Download the ZIP file from the start of the tutorial and extract the contents to somewhere on your computer. You’ll see three folders with assets. Let’s start with the icons. Inside of the Icons Folder Contents drag the 4 icons into the Unity project’s Icons folder.
- Select all the icons
- In the Inspector, set the Texture Type to Sprite (2D and UI)
- Click Apply

Then inside of our Models folder, drag in the assets from the Models Folder Contents.

For each of the materials in this folder:
- Select it
- In the Inspector, set the Albedo Texture to the relative texture PNG in the folder
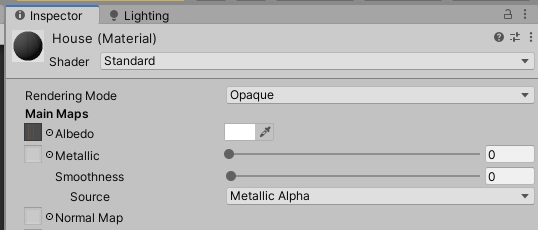
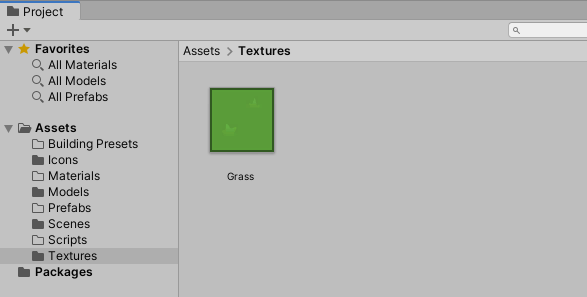
Finally, inside of the Textures folder, drag in the single image from the Textures Folder Contents folder.
Creating the Unity City Builder Environment
Let’s give our Unity city builder somewhere to exist.
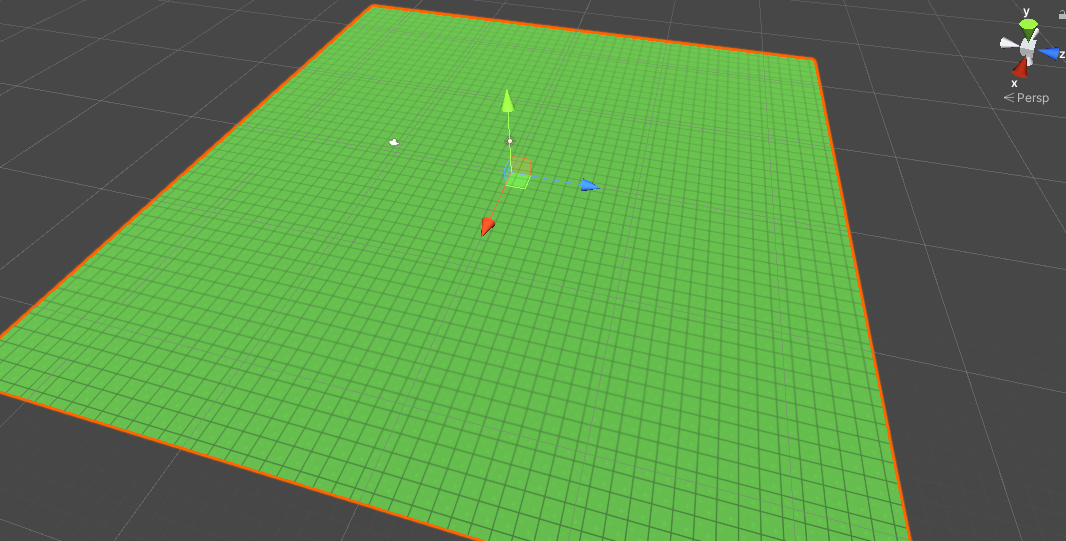
To begin, let’s create our base from where we’ll be placing buildings. First, create a new 3D plane object and rename it to Ground. Then set the Scale to 5, 5, 5.

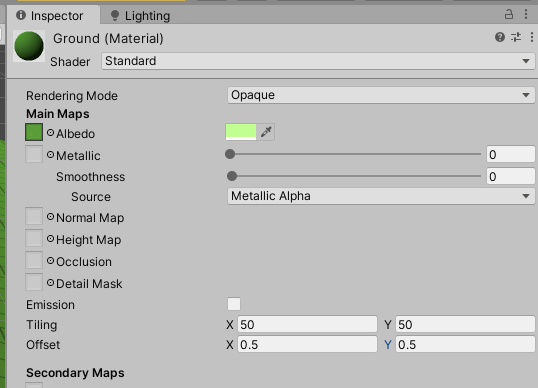
In the Materials folder, create a new material called Ground and apply it to the ground plane.
- Set the Albedo Texture to be the ground texture
- Set the Albedo Color to be a light green
- Set the Tiling to 50, 50
- Set the Offset to 0.5, 0.5
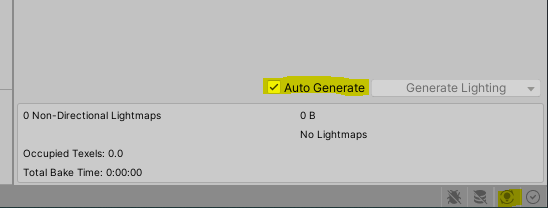
You may notice that the lighting is a bit off. To fix this, go to the bottom right corner of the screen and click on the Auto Generate Lighting button. This will open up the Lighting window where at the bottom, you can enable Auto Generate.
Camera Controller
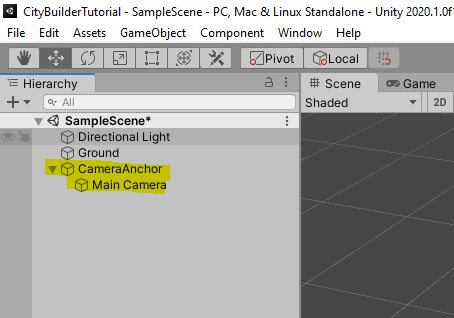
In this Unity city builder, we’re going to have a camera that can move around, look, and zoom in and out. To begin, let’s create a new empty object called CameraAnchor.
- Set the Position to 0, 0, 0
- Set the Rotation to -50, 45, 0
Then we can drag the Main Camera in as a child.
- Set the Position to 0, 20, 0
- Set the Rotation to 90, 0, 0
Also on the Main Camera, let’s change our Field of View to 20.

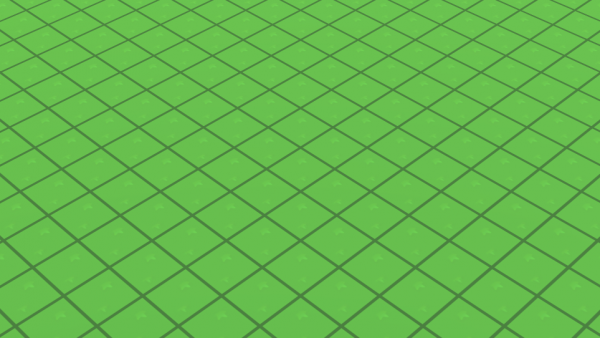
Here’s what it should look like in the Game view:
Scripting the Camera Controller
Create a new C# script called CameraController and attach it to the CameraAnchor object. Open the script up in Visual Studio so we can begin to create it.
Let’s start with our variables.
public float moveSpeed;

public float minXRot;
public float maxXRot;

private float curXRot;

public float minZoom;
public float maxZoom;

public float zoomSpeed;
public float rotateSpeed;

private float curZoom;
private Camera cam;
In the Start function, we can setup some initial values and get the camera.
void Start ()
{
    cam = Camera.main;
    curZoom = cam.transform.localPosition.y;
    curXRot = -50;
}
From here on, we’ll be working inside of the Update function. First, we have the code for zooming in and out with the scroll wheel.
curZoom += Input.GetAxis("Mouse ScrollWheel") * -zoomSpeed;
curZoom = Mathf.Clamp(curZoom, minZoom, maxZoom);

cam.transform.localPosition = Vector3.up * curZoom;
Then if we’re holding down the right mouse button, we want to rotate the camera around.
if(Input.GetMouseButton(1))
{
    float x = Input.GetAxis("Mouse X");
    float y = Input.GetAxis("Mouse Y");

    curXRot += -y * rotateSpeed;
    curXRot = Mathf.Clamp(curXRot, minXRot, maxXRot);

    transform.eulerAngles = new Vector3(curXRot, transform.eulerAngles.y + (x * rotateSpeed), 0.0f);
}
Finally, we want to implement the movement. We can move forwards, back, left and right relative to where we’re facing.
Vector3 forward = cam.transform.forward;
forward.y = 0.0f;
forward.Normalize();
Vector3 right = cam.transform.right.normalized;

float moveX = Input.GetAxisRaw("Horizontal");
float moveZ = Input.GetAxisRaw("Vertical");

Vector3 dir = forward * moveZ + right * moveX;
dir.Normalize();

dir *= moveSpeed * Time.deltaTime;

transform.position += dir;
Save that and return to the editor. We can select the camera anchor and fill in the properties:
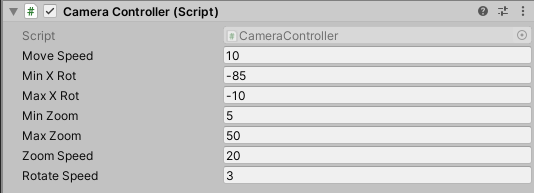
Press play and test it out!
Creating the Unity City Builder UI
Although we don’t have the Unity city builder’s systems running yet, let’s begin by creating the UI. First, create a new canvas object which is the container for our UI. As a child of the canvas, create a new UI image and call it Toolbar.
- Set the Anchoring to be bottom-stretch
- Set the Left and Right to 0
- *Set the Pos Y to 50
- Set the Height to 100
- Set the Color to be dark grey
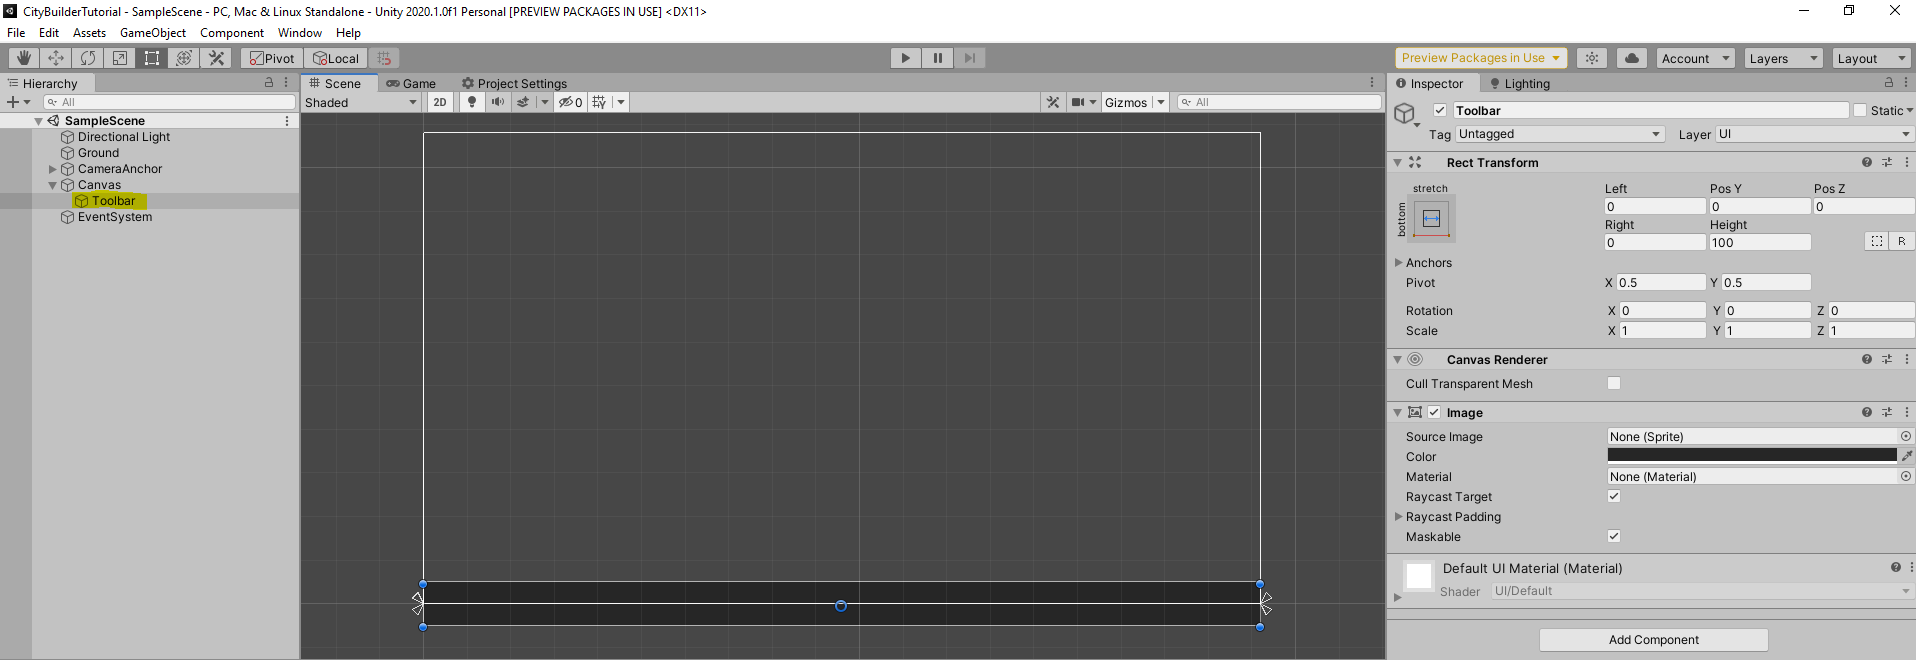
Then as a child of the toolbar, create a new UI image and call it HouseButton.
- Set the Anchoring to middle-left
- Set the Position to 50, 0, 0
- Set the Width and Height to 80
- Set the Source Image to Building_House.png
- Add a Button component
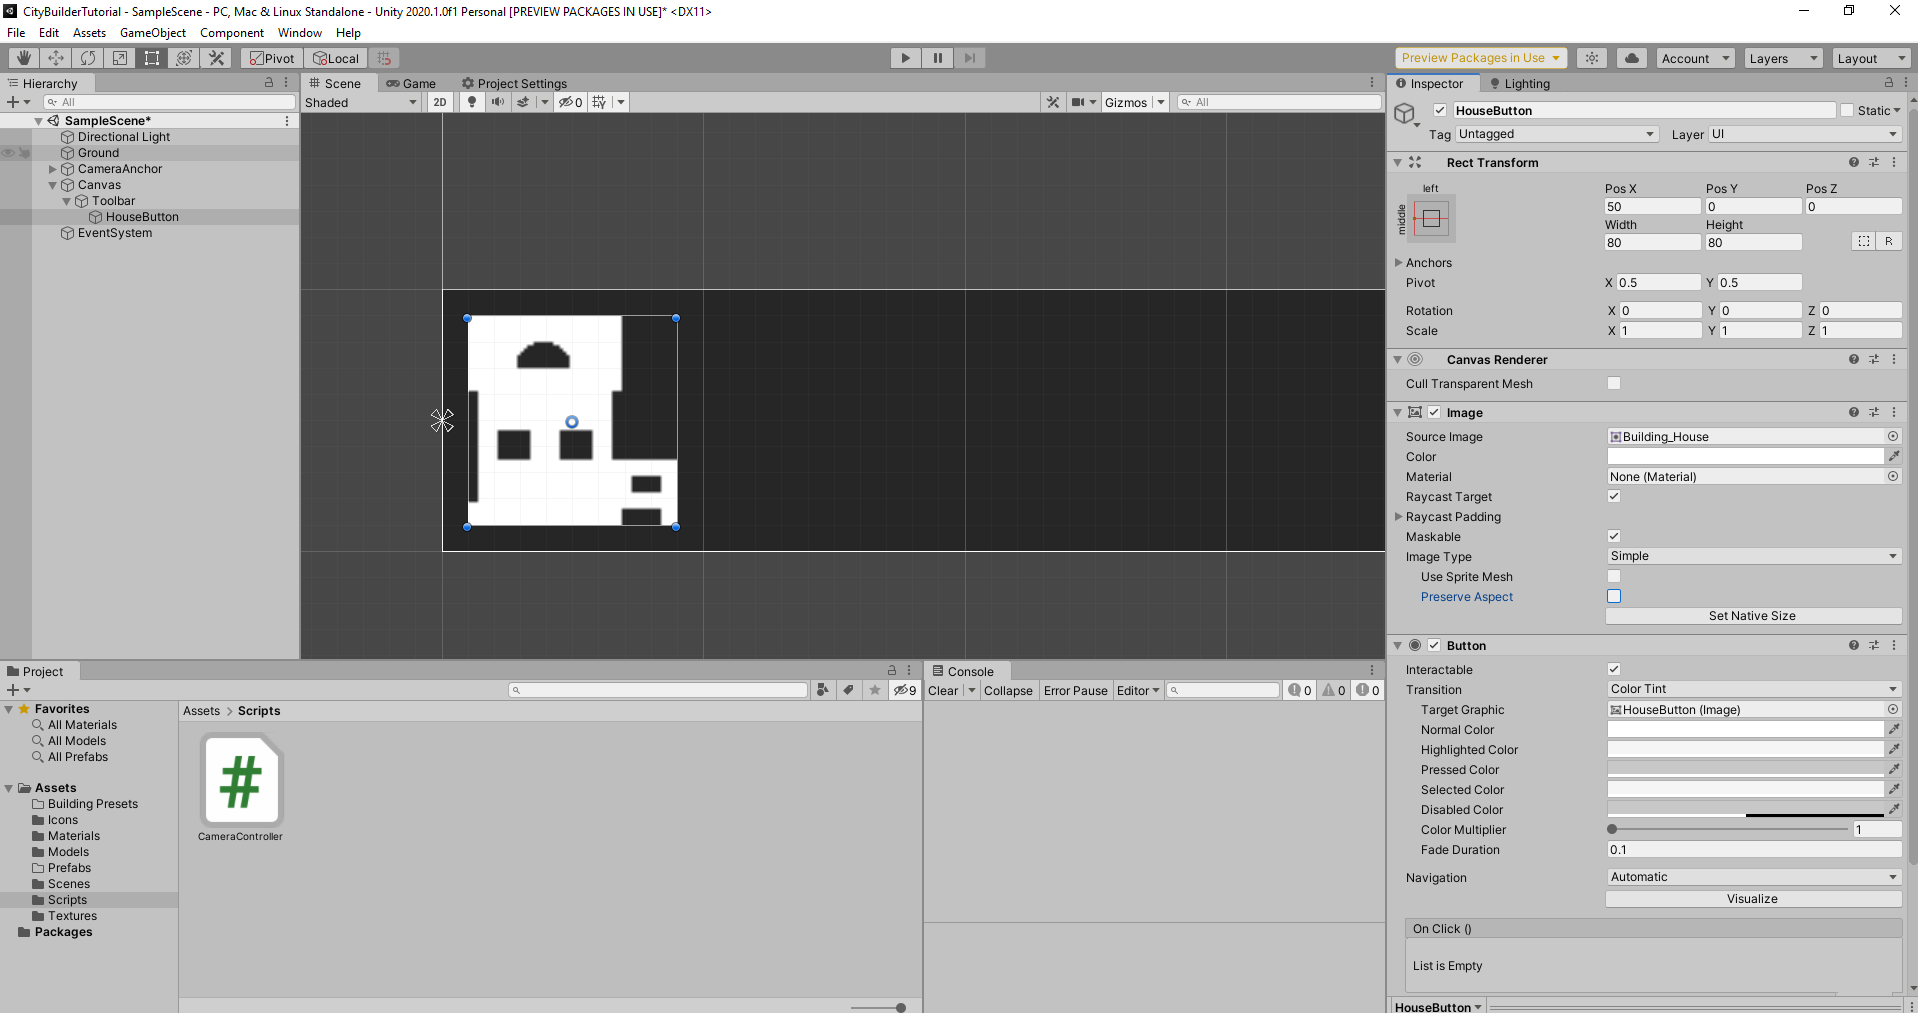
Next to this button, create three more for the Factory, Farm and Road buildings.
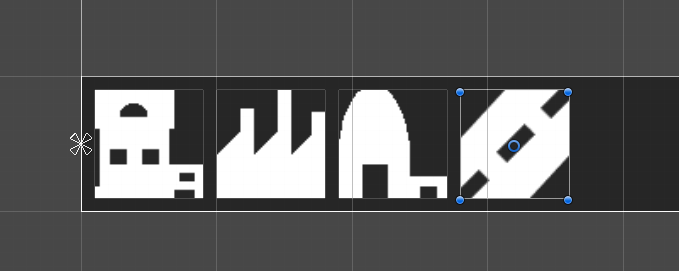
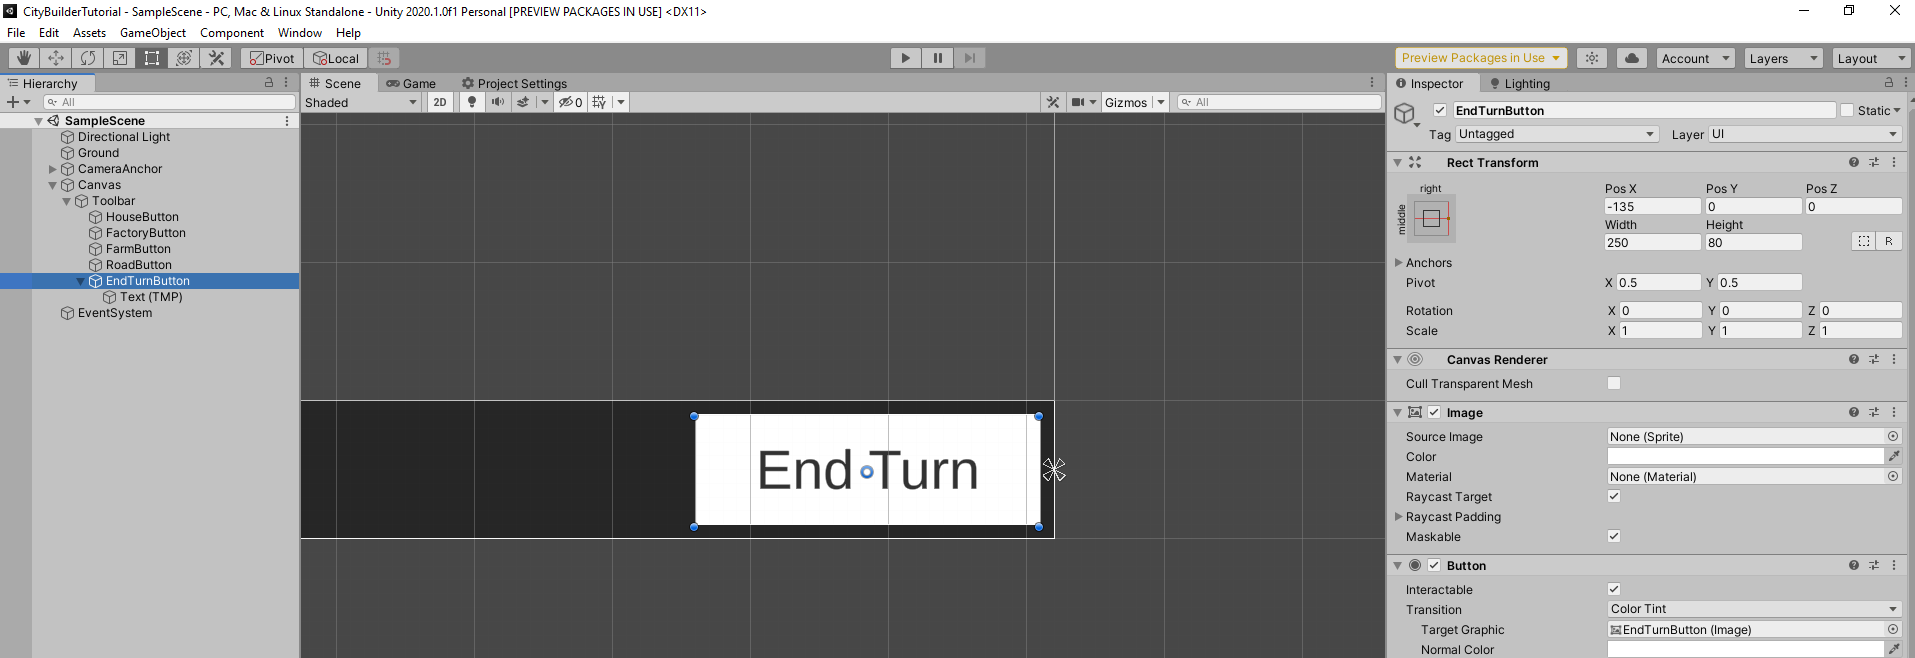
After this, as a child of the toolbar, create a new UI > Button – TextMeshPro. Import the TMP essentials when it asks.
- Set the Anchoring to middle-right
- Set the Position to -135, 0, 0
- Set the Width to 250
- Set the Height to 80
- Set the Source Image to none
- Set the child text to display: End Turn
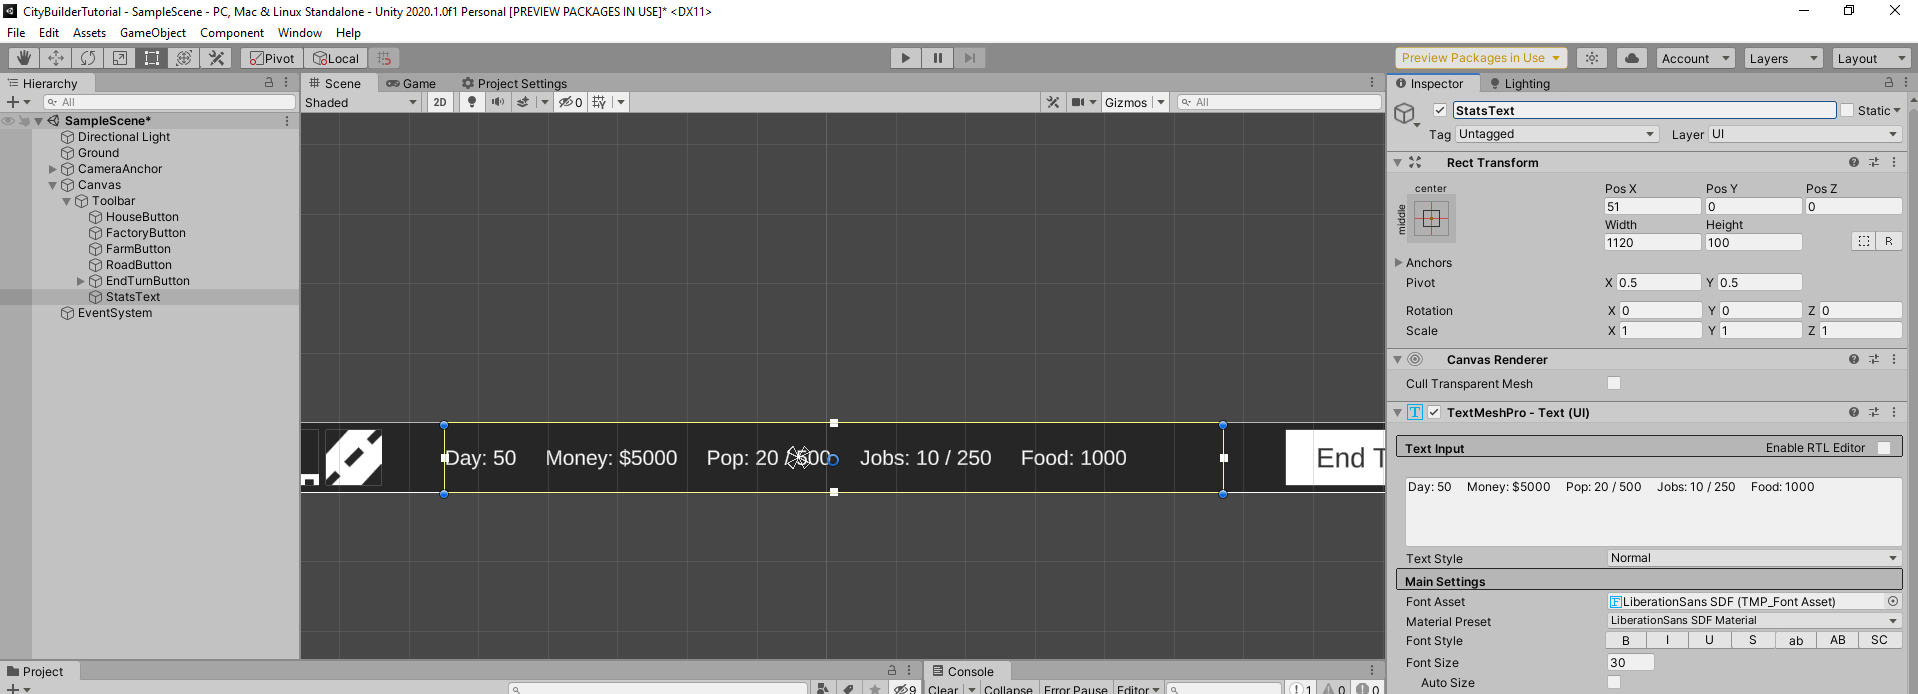
Finally, we want to create a new Text Mesh Pro text object and call it StatsText.
- Set the Position to 50, 0, 0
- Set the Width to 1120
- Set the Height to 100
- Set the text to display what’s in the image below as a template:
Unity City Builder – Building Presets
Struggling? Zenva’s Strategy Game Development Academy not only addresses city building, but it’s a comprehensive resource for learning to build strategy games with Unity and suited for beginners.
In this Unity city builder, we’ll be using scriptable objects to create our buildings. This will allow us to easily add new ones with a pre-existing system that’s already in place whenever we want. To begin, let’s create a new script called BuildingPreset and open it up.
At the top of the class, we need to first add in the UnityEditor namespace, the CreateAssetMenu attribute and make the class extend from ScriptableObject.
using System.Collections;
using System.Collections.Generic;
using UnityEngine;
using UnityEditor;

[CreateAssetMenu(fileName = "Building Preset", menuName = "New Building Preset")]
public class BuildingPreset : ScriptableObject
{
...
Then inside of the class, we can create our variables.
public string displayName;
public int cost;
public int costPerTurn;
public GameObject prefab;

public int population;
public int jobs;
public int food;
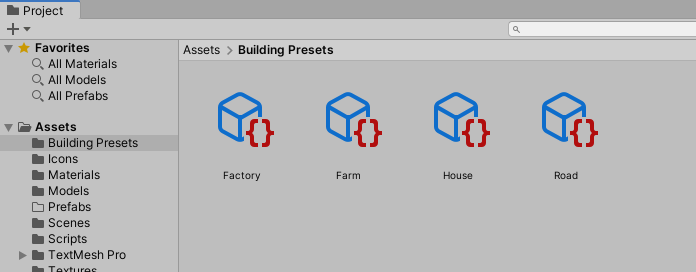
Scriptable objects allow us to create an instance of an asset with custom properties and functions. We’ll be creating one for each of our buildings. In the Building Presets folder, create 4 new building presets (right click and select Create > New Building Preset).
- House
- Farm
- Factory
- Road
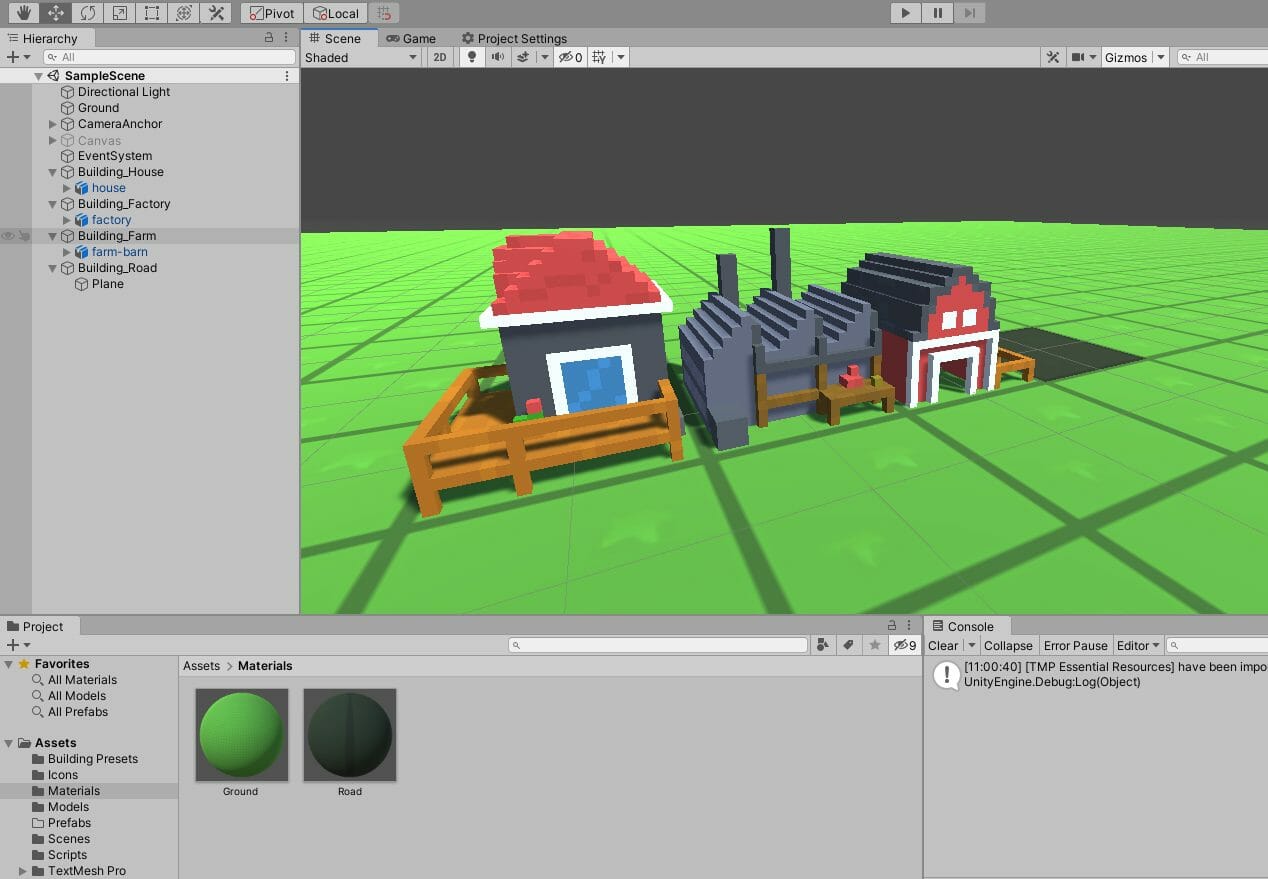
Next, we need to create the building objects. For each building, do the following:
- Create an empty GameObject called Building_[building type]
- Drag in the 3D model as a child
- Set the Scale to 0.045, 0.045, 0.045
- Set the Rotation to 0, 180, 0
- Apply the respective material
- Save it to the Prefabs folder
When it came to the road, I just used a 3D plane with a new material.
From here, we can go back to our 4 building presets and fill in their information. This part is really up to you in order to test out which values are best, but here are mine:
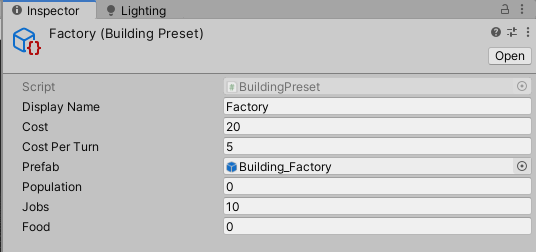
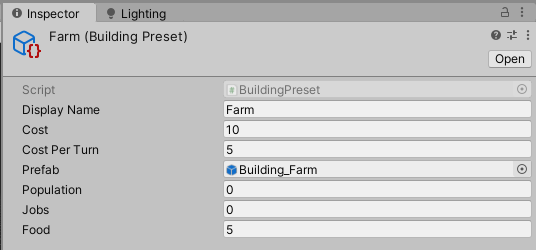
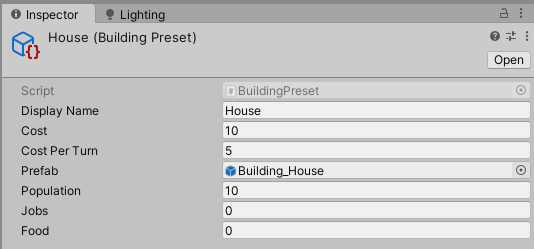
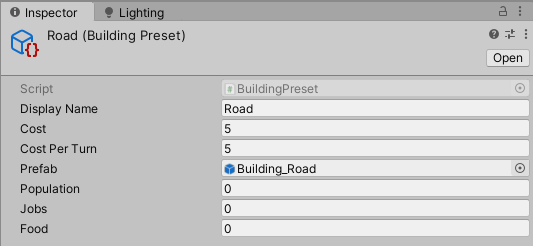
Unity City Builder Management Script
Now we can create the C# City script and attach it to an empty GameObject called _GameManager. This script is going to manage our population, money, jobs, food and overall processes.
First, let’s add the text mesh pro namespace to our script.
using TMPro;
Then we can create our variables as well as a singleton so we can access this script from anywhere in the project.
public int money;
public int day;
public int curPopulation;
public int curJobs;
public int curFood;
public int maxPopulation;
public int maxJobs;
public int incomePerJob;

public TextMeshProUGUI statsText;

private List<BuildingPreset> buildings = new List<BuildingPreset>();

public static City inst;

void Awake()
{
    inst = this;
}
When we place down a building, the OnPlaceBuilding function will be called.
public void OnPlaceBuilding (BuildingPreset building)
{
    maxPopulation += building.population;
    maxJobs += building.jobs;
    buildings.Add(building);
}
At the end of every turn, we’ll need to calculate our population, money, jobs, food, etc. Let’s start with the CalculateMoney function.
void CalculateMoney ()
{
    money += curJobs * incomePerJob;

    foreach(BuildingPreset building in buildings)
        money -= building.costPerTurn;
}
Then the CalculatePopulation function which will figure out how many people are in the city.
void CalculatePopulation ()
{
    maxPopulation = 0;

    foreach(BuildingPreset building in buildings)
        maxPopulation += building.population;

    if(curFood >= curPopulation && curPopulation < maxPopulation)
    {
        curFood -= curPopulation / 4;
        curPopulation = Mathf.Min(curPopulation + (curFood / 4), maxPopulation);
    }
    else if(curFood < curPopulation)
    {
        curPopulation = curFood;
    }
}
The CalculateJobs function figures out how many jobs are being worked.
void CalculateJobs ()
{
    curJobs = 0;
    maxJobs = 0;

    foreach(BuildingPreset building in buildings)
        maxJobs += building.jobs;

    curJobs = Mathf.Min(curPopulation, maxJobs);
}
And finally, the CalculateFood function.
void CalculateFood ()
{
    curFood = 0;

    foreach(BuildingPreset building in buildings)
        curFood += building.food;
}
Now what’s going to call of this? The EndTurn function which gets called when we click on the End Turn button. The long line is where we’re setting the stats text to display all of our new information. You can of course change this to how you like (if you prefer separate text elements).
public void EndTurn ()
{
    day++;
    CalculateMoney();
    CalculatePopulation();
    CalculateJobs();
    CalculateFood();

    statsText.text = string.Format("Day: {0}   Money: ${1}   Pop: {2} / {3}   Jobs: {4} / {5}   Food: {6}", new object[7] { day, money, curPopulation, maxPopulation, curJobs, maxJobs, curFood });
}
Back in the editor, here’s what my _GameManager object looks like:
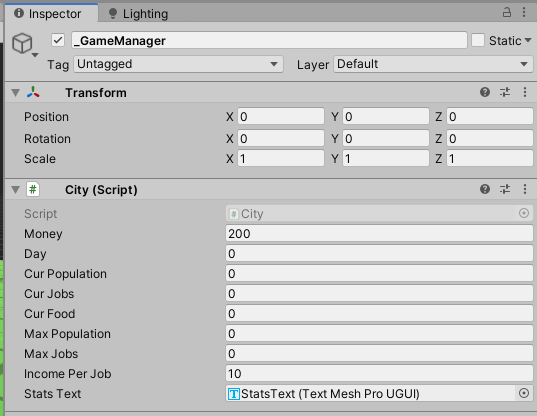
Also, select the EndTurnButton and add a new listener to the OnClick event which links to the EndTurn function.

So now if you press play, you should be able to click on the end turn button and see the stat text update.
Placing Buildings in Unity City Builders
Create a new C# script called Selector and attach it to the _GameManager object. This script will manage detecting our mouse in world coordinates.
First, we want to add this namespace so we can see if we’re clicking on UI.
using UnityEngine.EventSystems;
Then we can create our variables as well as singleton .
private Camera cam;
public static Selector inst;

void Awake ()
{
    inst = this;
}
In the Start function, we’ll get the camera.
void Start ()
{
    cam = Camera.main;
}
Then the main function, GetCurTilePosition. This will return the position of the tile we’re currently hovering over.
public Vector3 GetCurTilePosition ()
{
    if(EventSystem.current.IsPointerOverGameObject())
        return new Vector3(0, -99, 0);

    Plane plane = new Plane(Vector3.up, Vector3.zero);
    Ray ray = cam.ScreenPointToRay(Input.mousePosition);
    float rayOut = 0.0f;

    if(plane.Raycast(cam.ScreenPointToRay(Input.mousePosition), out rayOut))
    {
        Vector3 newPos = ray.GetPoint(rayOut) - new Vector3(0.5f, 0.0f, 0.5f);
        return new Vector3(Mathf.CeilToInt(newPos.x), 0, Mathf.CeilToInt(newPos.z));
    }

    return new Vector3(0, -99, 0);
}
Next, let’s return to the editor and create a new empty GameObject called PlacementIndicator. This object will appear when we click on a building to place and will show where we’re going to be placing it. As a child of this object, create a new cube and move it up so it’s sitting on the surface. Create a new material and assign it to the cube.
- Set the Rendering Mode to Fade
- Set the Albedo Color to blue
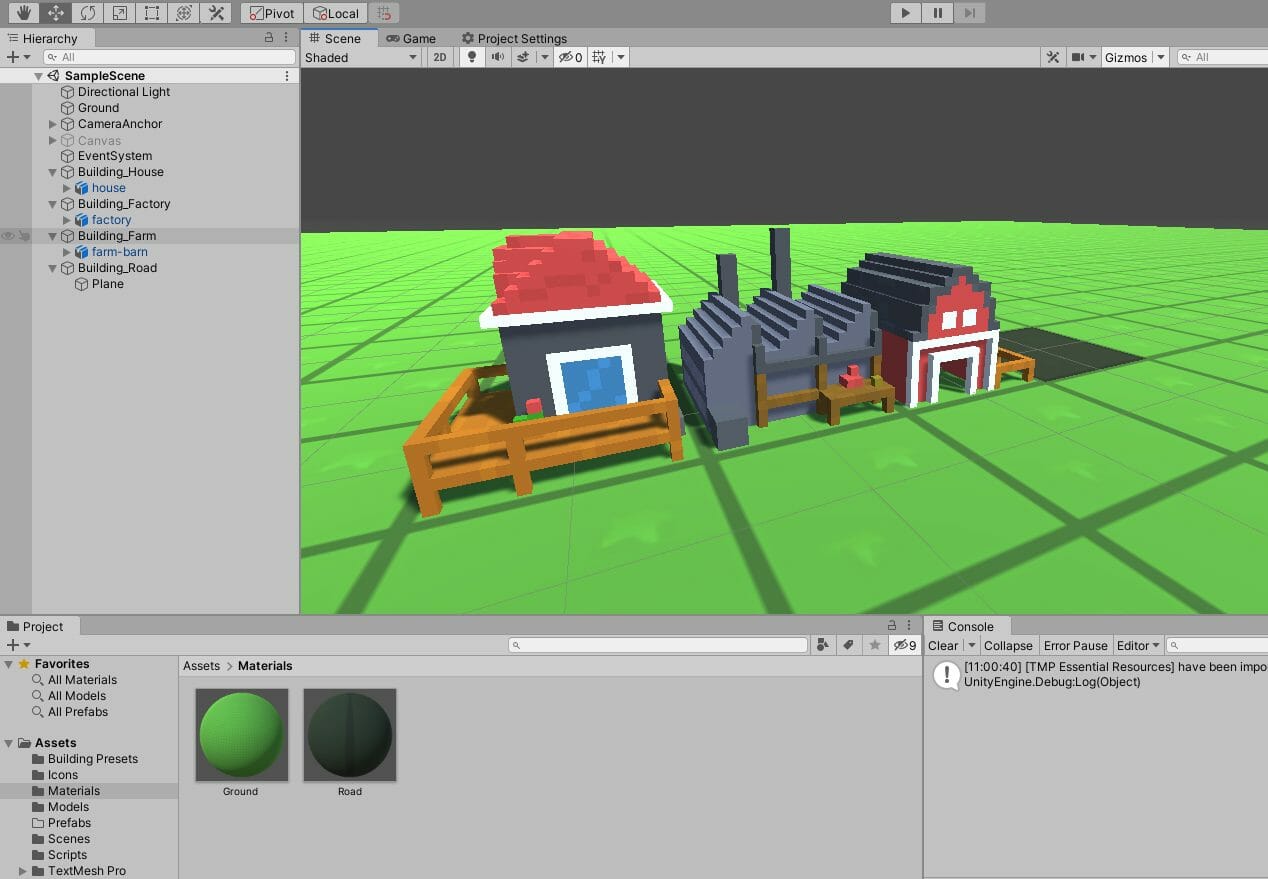
Then we can go ahead and disable the object so it’s not visible. Next, create a new C# script called BuildingPlacer. We’ll start with varaibles and singleton.
private bool currentlyPlacing;
private BuildingPreset curBuildingPreset;

private float placementIndicatorUpdateRate = 0.05f;
private float lastUpdateTime;
private Vector3 curPlacementPos;

public GameObject placementIndicator;
public static BuildingPlacer inst;

void Awake ()
{
    inst = this;
}
The way the placement indicator will work, is that if currentlyPlacing is true – the placement indicator object will snap to the current grid position that the mouse is over every 0.05 seconds. 0.05 seconds because doing it every frame may cause performance issues.
The BeginNewBuildingPlacement function will be called once we click on a building in the UI toolbar.
public void BeginNewBuildingPlacement (BuildingPreset buildingPreset)
{
    if(City.inst.money < buildingPreset.cost)
        return;

    currentlyPlacing = true;
    curBuildingPreset = buildingPreset;
    placementIndicator.SetActive(true);
}
The CancelBuildingPlacement function gets called if we press the escape key when placing and once we place down a building.
public void CancelBuildingPlacement ()
{
    currentlyPlacing = false;
    placementIndicator.SetActive(false);
}
PlaceBuilding gets called when we click on the grid to place the building down.
void PlaceBuilding ()
{
    GameObject buildingObj = Instantiate(curBuildingPreset.prefab, curPlacementPos, Quaternion.identity);
    City.inst.OnPlaceBuilding(curBuildingPreset);

    CancelBuildingPlacement();
}
Finally, in the Update function we’ll do a few things. First, if we press escape – cancel the building placement. If we are placing a building down, make it follow the cursor and when we press left mouse button – place it down.
void Update ()
{
    if(Input.GetKeyDown(KeyCode.Escape))
        CancelBuildingPlacement();

    if(Time.time - lastUpdateTime > placementIndicatorUpdateRate && currentlyPlacing)
    {
        lastUpdateTime = Time.time;

        curPlacementPos = Selector.inst.GetCurTilePosition();
        placementIndicator.transform.position = curPlacementPos;
    }

    if(currentlyPlacing && Input.GetMouseButtonDown(0))
    {
        PlaceBuilding();
    }
}
Back in the editor, select the _GameManager object and drag in the placement indicator object.

Now we need to do the following for each of the 4 building buttons:
- Add a new listener to the button’s OnClick event.
- Set that to be the building placer’s BeginNewBuildingPlacement function
- Set the parameter to be the respective Building Preset asset
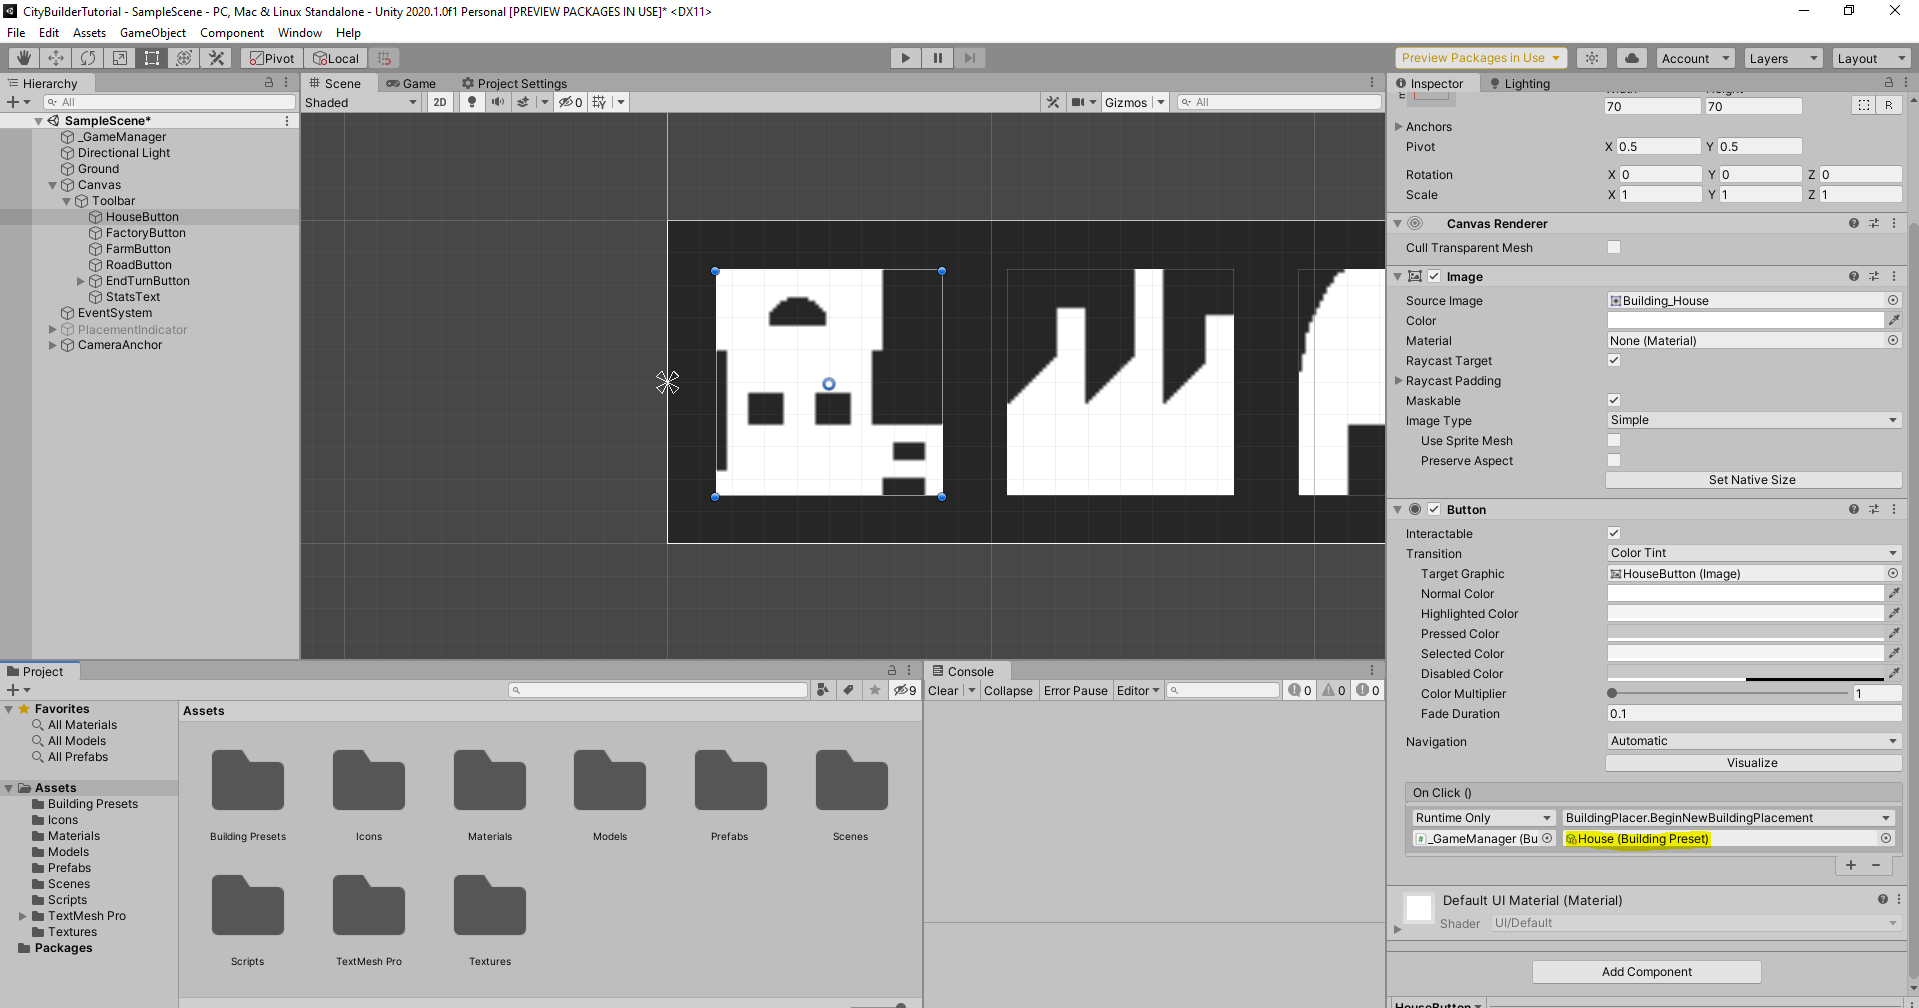
Once all the buttons are linked up you can press play and test it out!
The various different building stats will need to be tweaked in order to get the gameplay you desire.
Unity City Builder Conclusion
Congrats on finishing the tutorial! As promised, we just created the foundations for a Unity city builder.
With this project, we’ve explored a lot of fundamental mechanics you’ll find in most city-building games, such as moving and rotating the camera, using buildings to calculate resources, and more. From here, you can expand upon the game in a ton of different ways, such as: adding in more buildings, implementing new resources or calculation mechanics, and even updating the visuals. Tools like the selector can be used for other things too, like selecting buildings and even upgrading them once placed down.
As you explore the process of creating a Unity City Builder Game from scratch, Zenva’s Strategy Game Development Academy could be an indispensable tool. This comprehensive collection of tutorials teaches how to build strategy games with Unity, from handling enemy AI to managing resources, making it a pertinent resource for this particular endeavor. Not to mention, understanding these techniques can provide a solid foundation for various other game development projects, making the Academy a valuable asset for aspiring and seasoned developers alike.
Whatever you decide, I hope these foundations help inspire your next game project! Thanks for following along, and I wish you the best of luck with your future games.
Did you come across any errors in this tutorial? Please let us know by completing this form and we’ll look into it!

FINAL DAYS: Unlock coding courses in Unity, Godot, Unreal, Python and more.
