Games involve interaction, so players need a way to send their input. In this tutorial, we’ll explore the Unity input system which can be used for any game imaginable to render easy, multi-system controls.
You can access the full course here: The Complete 2D Roguelike Course
Table of contents
New Unity Input System
In this lesson, we’re going to be setting up our inputs using the new Unity Input System.
While the old Unity input system still works, this is now the recommended way, as it allows you to easily set up Unity controller input and Unity keyword input with the same menu simple and fast.
Installing the Unity Input System Package
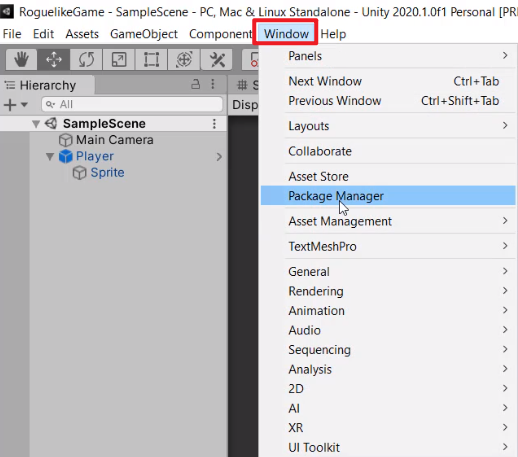
Let’s open up the Package Manager window (Window > Package Manager).
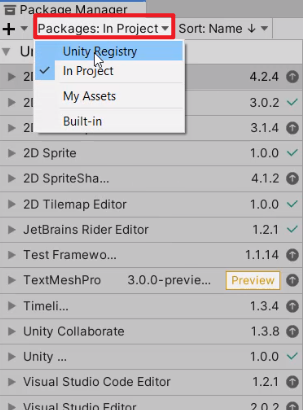
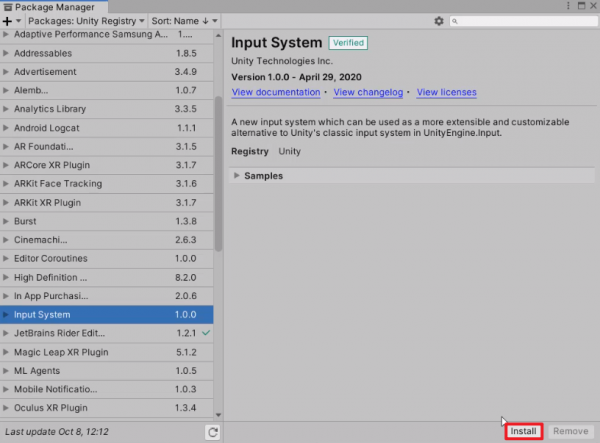
Select Packages > Unity Registry to access all the Unity packages, and install the Input System package.
Creating Unity Input Actions
In order for our Unity input system to work, we need to set up what are known as Unity Input actions.
Once you’ve installed the package, we can right-click on the Project window and click on Create > Input Actions.
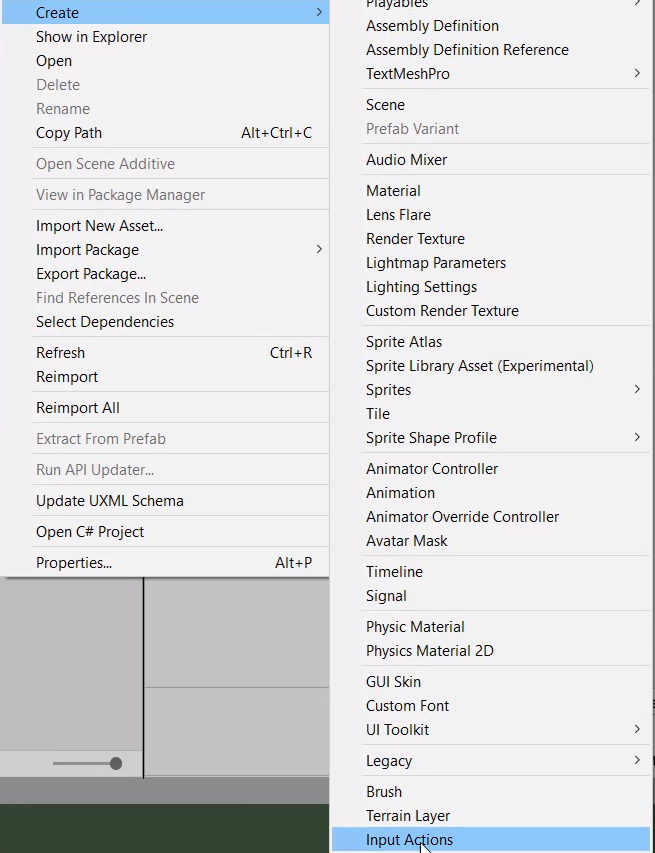
We’re going to call this “MainControls” and double-click to open it up (as the name implies, this is for our main game controls).

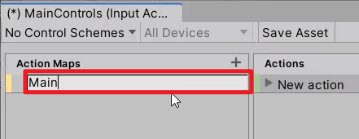
This is going to open up the Unity Input Actions window. On the leftmost panel, we can create an Action Map by clicking on the + button. This is basically a category for all your different inputs.

We’ll call the first Unity action map “Main“, and create a new Action connected to the “Main” action map. Actions define what we want to do when pressing certain keys on the keyboard or even buttons on a controller (and part of why this new Unity input system is fantastic).

So first, let’s create an action called “Move Up“, something common for Unity player input. Then we can bind a custom key to the action by clicking on No Binding > Path > Listen.
![]()

Then we can press the “w” key on our keyboard, and select W [Keyboard].
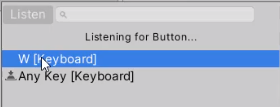
Now you’ll see that “Move Up” has a binding of “W”:

In our game, we’re going to have 8 different buttons: move up / down / left / right using the W / A / S / D keys, as well as attack up / down / left / right using the arrow keys.
Of course, your player input may be different, so you don’t have to follow our Unity input system example exactly (and can even use controller input instead).
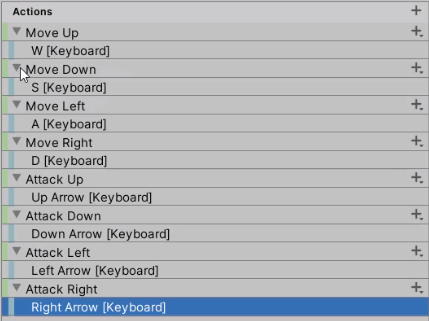
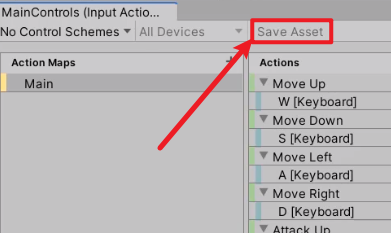
Before you close the window, make sure that the asset is saved.
Detecting Unity Player Inputs
In order to detect and make use of these inputs from the Unity input system, we need to select our Player object and add a new component called “Player Input“.
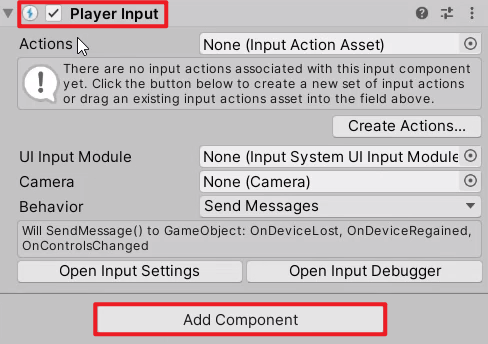
Then, drag the Unity Input Action asset into the Actions property of Player Input.

The behavior property defines how we’re going to be detecting when we press our buttons. Each behavior has its pros and cons, but we won’t be covering this in this particular Unity input system tutorial.
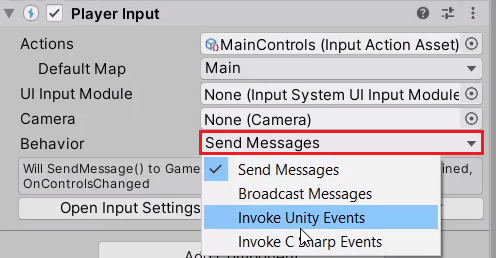
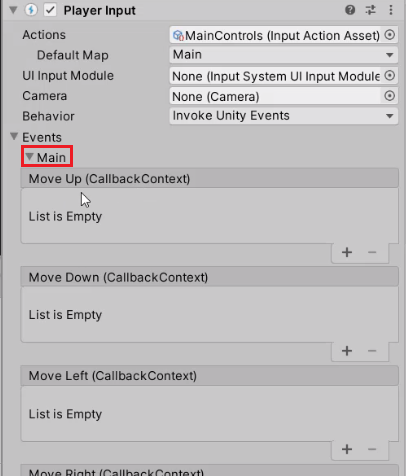
If we change this from ‘Send Messages‘ to ‘Invoke Unity Events‘, you’ll get access to the ‘Main‘ Action Map, which contains all the actions that we created earlier. We can now create a function inside of a C# script and link it up here.
Linking Action Through Script
Let’s open up Assets > Scripts, and double-click on the Player script.
First of all, we need to import the Unity input system package library to get access to the InputSystem at the top of the script.
using UnityEngine.InputSystem;
Then we’re going to create a function that will be called whenever we press the ‘W‘ (Move up) key. This function will take in a parameter of type CallbackContext, which contains various different information about the input, such as which key was pressed, at which frame the key was pressed, etc.
public void MoveUp (InputAction.CallbackContext)
{

}
Each action will need its own function to bind with, so let’s duplicate the function and rename it:
public void MoveUp (InputAction.CallbackContext)
{

}
public void MoveDown (InputAction.CallbackContext)
{

}
public void MoveLeft (InputAction.CallbackContext)
{

}
public void MoveRight (InputAction.CallbackContext)
{

}
public void AttackUp (InputAction.CallbackContext)
{

}
public void AttackDown (InputAction.CallbackContext)
{

}
public void AttackLeft (InputAction.CallbackContext)
{

}
public void AttackRight (InputAction.CallbackContext)
{

}
We can then click on the Add (+) button and drag in the Player script into the Object field. This will allow us to select the functions inside the script.
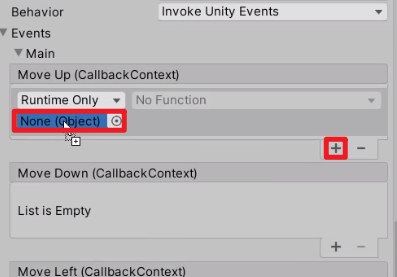
(If they’re not appearing here, make sure to check that the functions are set to be ‘public’ and that your script is saved to apply those changes.)
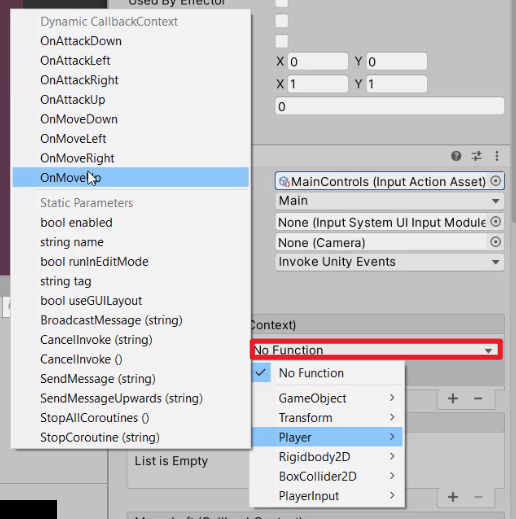
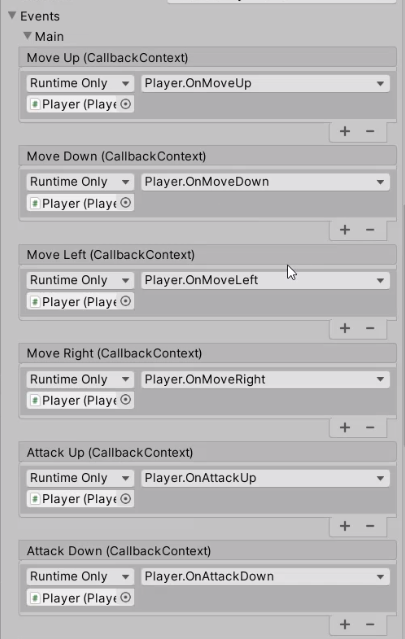
And that’s it for the Unity Input system! Now whenever the keys we set up are pressed, they will trigger the functions we connected to our Unity player input component.
In this example, we didn’t add any actual functionality – but this is where you can experiment and find out how customizable the Unity Input System is!
Transcript – Unity Input System
Welcome back everyone. In this lesson, we are going to be setting up our inputs in order to be able to register them when we are playing the game. So what we’re gonna be doing for this is using Unity’s new input system and this is a great addition to Unity which replaces the currently existing input system and it allows us to do a lot more stuff.
So to get this we’re gonna go to window, open up the Unity Package Manager, which is where we can download additional packages to add to our Unity project. Let’s go up to where it says packages in project and select Unity registry to see a large list of all the Unity packages. We then want to scroll down to where it says input system right here and click install and this is gonna begin installing the input system.
After it’s finished installing, a pop-up will appear so we can just click on yes. So the Unity Editor will close itself and then restart and once that’s done we have the input system setup and ready to go.
So we can close out of the package manager here and then inside of our project browser, we can right click and go create, and then right at the bottom there is a option called input actions. We’re gonna select that and we’re gonna call this, let’s just say we got of course our main controls, you can call it whatever you want, this is just the file name. And then we can double-click on it to open up the input actions window right here.
Now the way Unity’s input system has been setup, is first of all we need to create an action map and this is basically a category you could say for all your different inputs. So if you’re creating maybe an FPS game, you’ll have maybe a general input map, maybe you have a vehicle input map, maybe a aircraft input map, sort of different categorizations of input maps that you want.
Well in our game it’s pretty simple, we’re only gonna have basic controls, so I’m gonna click on the plus right here. And I’m gonna call this input map main, okay, this is gonna be our main input map. Now on the next screen here is where we have our actions and our actions are what we want to be able to do, what buttons are we gonna be pressing to do certain things.
Well in our game we are going to have eight different buttons: we’re gonna have four movement buttons and we are gonna have four attack buttons. Okay, so we’ll be able to move around with the W, A, S, and D keys. And we’ll be able to attack in the various four different directions with the arrow keys, okay. So we press up arrow to attack upwards, down arrow to attack downwards, W, A, S, D to move in the four directions as well then.
Okay, so what we need to do is where it says new action here, I’m gonna double click on that to rename it to be move up, okay, so move up right here. We can then click on this little arrow next to the action and you’ll see it says no binding, okay. And a binding is basically a key or an axis that is assigned to an action to basically tell it what button do we need to press down in order for this action to trigger.
So the binding here we can select it, and then on the properties window here, we are gonna click on where it says the path and we are gonna click listen. Now the great thing about this is we can then click any button and it is gonna pop up here for us to choose. So let’s just press W, there we go, W keyboard we can select that right there, and now you can see move up has a binding of W. So whenever we press W, the move up action is gonna be triggered and then we are able to detect when that happens.
Okay, so what I want you to do now is a bit of a challenge, go ahead and create the remaining seven different actions, move down, move left, move right, attack up, attack down, attack left and attack right, okay. So I’ll be right back to see how you done.
Okay, so there we go. I’ve got my eight different actions now, we got move up, down, left or right, attack up, down, left and right here with the correct bindings assigned to them. So we can then click on the save asset button right here to save the asset, make sure you do that as it won’t save otherwise.
It also something to keep in mind is that you can also use controllers and various other input methods. If we go over here to the binding path, you’ll see that we have gamepads, joysticks, keyboard, mouse, pen, pointer, XR controllers, touchscreen, pretty much any input device you can think of is being detected by Unity here and can be assigned as a binding.
And you can assign multiple different bindings to an action, if you just click on the plus next to the binding and click add binding, you can maybe then add in a controller attack right button then as well and both of those will be detected. I’m just gonna cut this one right here to get rid of it. So make sure the asset is saved then we can close out of this window here and our main controls has been set up.
Now what we need to do is actually have a way of detecting these inputs. So I’m gonna select our player right here, I’m gonna click on open to open up that prefab. And we need to create a new script here called player inputs, okay. This is a script that is made with Unity’s input system. And this is basically how we are gonna be detecting our inputs.
So first of all, we need to give it an input action asset, so I’m just gonna drag in our main controls asset right here to assign it. And then you’ll see down here, we have our behavior and the behavior that basically defines how we are going to be detecting when we press our buttons.
So right now it is set to send messages which is basically a function call, although this can be quite slow and isn’t really the best method of doing this. In fact, what we’re going to do is select this drop-down and choose Invoke Unity Events, okay. And Invoke Unity Events, if we click on events right here, you’ll see there is a list if we open up the main then, we have a event for move up, move down, move left, move right, attack up, down, left and right here, okay.
And basically, inside of our script we can create a function and then link it up here. I’m then going to go ahead and open up our player script right here inside of Visual Studio. And at the top here we are gonna add in a new library to be using and this is gonna be using UnityEngine.InputSystem right here, okay.
We can then go down to our player class, I’m gonna delete these start and update functions right here. And we need to create a function for each basically input action. So first of all here, I’m gonna go public void and I’m just gonna call this one OnMoveUp. And as a parameter we need to send over this specific parameter. This needs to be InputAction.CallbackContext, okay. This is basically data that has been given to us, it’ll tell us what key is pressed, is it on the first frame, is it been held down, a lot of information that we can use and I’m just gonna call this one context then.
Okay, so what I want you to do is go ahead and create these exact same functions for move down, left, right, attack up, left, right and down, okay, so create, make sure you have eight functions each for one of the actions and I’ll be right back to see how you done.
Okay, and here we go. As you can see, I’ve got all eight of my functions here with the correct parameter as well. So what we can then do is save this and return to our Unity project. And then going to select our player object, go to the inspector and in the events here, let’s open up the main and I’m gonna add a new event to this move up right here. I’m going to drag in our player script like so, and then I’m gonna select the player.OnMoveUp function right here.
Okay, so as you can see, on the move up event inside of the player input component, I’ve added a new listener by clicking on the plus, I’ve dragged in our player script or you can just drag in the player game object here, and then I’ve selected the player.OnMoveUp function.
Okay, we can do that again here for move down, click on the plus, I’m gonna drag in the player object here, and the function is gonna be player.OnMoveDown, okay, so this function is going to be called when we press the move down action key, which is D oh, which is S in this example.
So for you, I want you to go ahead and fill in the rest the move left or right, attack buttons here as well and fill in those events. So be right back to see how you done. And there we go, I’ve linked up all of our functions which we just created to their corresponding events right here and now we are ready to go.
So in the next lesson, we’re gonna be working on actually detecting these functions and basically moving our player around. So I’ll see you all then in the next lesson.
Interested in continuing? Check out the full The Complete 2D Roguelike Course course, which is part of our RPG Academy.
